Home lab upgrade: a new host!
I have been running a home lab for about 3-4 years. What started with 1 server with a local disk (Dell R200) pretty soon evolved into 2 servers (2x DELL R200) and a small cluster was born. This all started with VMware ESX 3.5 and back then 2x 8GB hosts would be enough to test several appliances/tools. Sadly appliances and virtual machines became more and more (mostly) memory consuming and I added my desktop as an extra “server” (with another 16GB RAM).
While this all works fine I started to realize a few things:
- Power: running a desktop and 2 old servers uses quite some electricity.
- Memory usage was still a problem!
- Both DELL servers are single core CPU’s

So I came to the conclusion that it was time for a major update and started looking at a new home lab server which would run as a host and one which would be my storage box (more on that later in an extra post). My first idea was upgrading my desktop with another 16GB and go for a nested environment. While I was doing some calculations and looking back at the constant growing rate on virtualisation, this just wouldn’t cut it.
I decided to buy a complete full server and thus started my journey for hardware. I started looking at whiteboxes and found several solutions but they all had the same problem as my desktop idea: 16GB or 32GB limits. You might think it’s a lot of memory for a home lab server but this won’t help you the next years. I needed a system which I could easily upgrade during the next 3-5 years.
I decided to jump onto several vendor websites like DELL, HP and SuperMicro and pretty soon realized that the complete systems which are offered by DELL and HP are very expensive. SuperMicro ain’t cheap either but with the correct mixing and matching I could make it fit my budget (1500 – 2000 €).
After doing some research I ended up with the following setup:
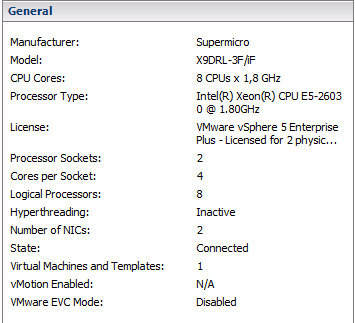
- CPU: 2 x Intel Xeon E5-2603, Sandy Bridge DP, 1.8Ghz 4 Core/4 Threads, no Turbo, 6.4GT/s QPI, 10MB cache, 80W
- Motherboard: Supermico X9DRL-iF, dual CPU socket, up to 256GB RAM, 8x SATA2 and 2x SATA3 ports, 2x Gb NICs
- RAM: 64GB (4*16GB) Samsung 1600Mhz Registered ECC (soon upgrade to 128GB)
- Case: Supermicro SC733TQ-665B, 4 x SATA/SAS hot-swappable, tower, 665W non-redundant Super Quiet (25dB), low-noise
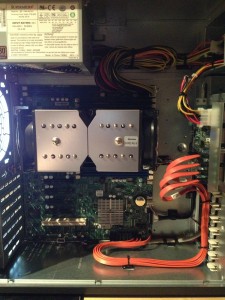
And this is the result:


I will be running ESXi using an USB stick (one of those 8GB sticks by Veeam), the only disk which I added is a 1TB WD disk since I also have a storage server since a few months (post about the specs coming up later). As some might have guessed, this server will be running a nested environment 😉 !
For now I am set and can get back to working onto VCAP-DCA and VCP-Cloud!
8 thoughts on “Home lab upgrade: a new host!”
Nice post. May I ask home it cost you to build as I am looking at building my own in the next few months.
This setup was about 1800 euro. The most expensive was the memory (due the 16GB slots). You can always take a lower CPU (E3 range) and save on the budget.
Good to see great minds think alike – same kit, same configuration as my vHydra build. I’ve also written up the build and costs along with a comparison to the popular Baby Dragon builds;
http://www.vexperienced.co.uk/2012/10/22/home-lab-a-scalable-vsphere-whitebox/
If you get voltage alerts you may need to upgrade your firmware.
Hello Ed,
Haven’t seen any voltage problems yet but I did do all the firmware upgrades ahead as I wanted to make sure I was up to date. Great system for a “smaller” budget. And I love the fact that the motherboard has onboard USB 🙂
Hello Niels. Very nice job and thanks for sharing this. I would like to do a very similar set up with the same motherboard. Do you know if the onboard RAID controller for the X9DRL-IF is support by ESX 5?
Thanks in advance
Hello, I sadly have no idea if it is supported. I have no RAID local storage in my lab, just 1 single disk for hosting some files.
Great article. One question…I am using the same board and am looking for VMware RAID drivers. Did you perform the install with standalong or RAID disks?
hello.
which is heatsink from processor ?
Comments are closed.